
Browser malfunctioning
Solved/Closed
Delta
-
Sep 26, 2015 at 12:32 AM
Computertech Posts 3569 Registration date Friday February 6, 2015 Status Contributor Last seen July 18, 2016 - Sep 26, 2015 at 01:23 AM
Computertech Posts 3569 Registration date Friday February 6, 2015 Status Contributor Last seen July 18, 2016 - Sep 26, 2015 at 01:23 AM
Related:
- Browser malfunctioning
- Ur browser - Download - Browsers
- Crazy browser - Download - Browsers
- Torch browser - Download - Browsers
- Flock browser - Download - Browsers
- Uc browser ccm - Download - Browsers
1 response

Computertech
Posts
3569
Registration date
Friday February 6, 2015
Status
Contributor
Last seen
July 18, 2016
893
Sep 26, 2015 at 12:53 AM
Sep 26, 2015 at 12:53 AM
Did you able to see any restore points?
To do this,
1. Do step 2, step 3, step 4, or step 5 below for how you would like to open System Restore.
2. Open the Win+X Power User Tasks Menu, click/tap on System, and go to step 6 below.
3. Open the Control Panel (icons view), click/tap on the System icon, and go to step 6 below.
4. Open the Control Panel (icons view), click/tap on the Recovery icon, click/tap on the Open System Restore link, click/tap on Yes if prompted by UAC, and go to step 9 below. (see screenshot below)
5. Open the Control Panel (icons view), click/tap on the Recovery icon, click/tap on the Configure System Restore link, and go to step 7 below. (see screenshot below)
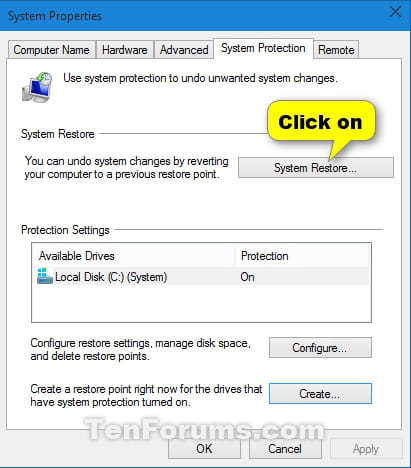
6. Click/tap on the System protection link on the left side. (see screenshot below)
7. If prompted by UAC, click/tap on Yes.
8. Click/tap on the System Restore button.. (see screenshot below)
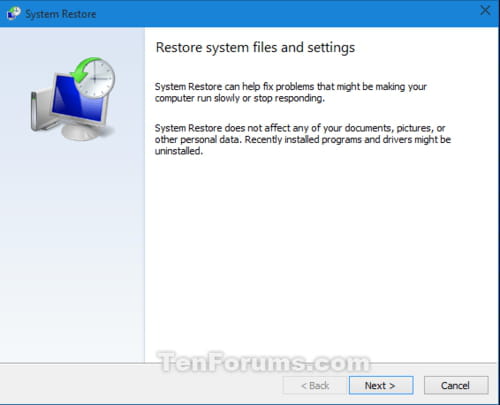
9. If this is your first time doing a System Restore, click/tap on Next. (see screenshot below)
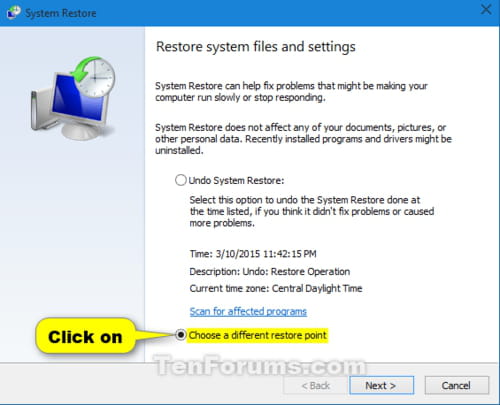
10. If you had previously done a System Restore, select (dot) Choose a different restore point, and click/tap on Next. (see screenshot below)
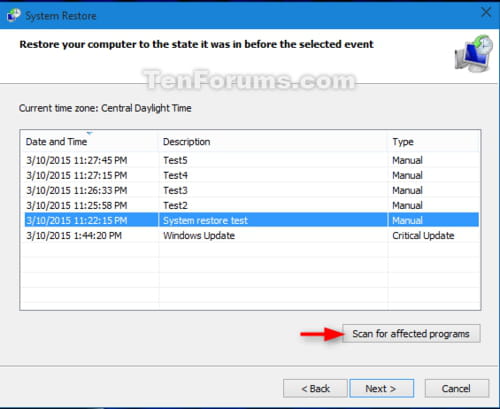
11. Select a restore point (ex: "System restore test") that you would like to restore Windows back to, and click/tap on the Scan for affected programs button. (see screenshot below)
Note:
If displayed, check the Show other restore points box at the bottom left corner to be able to see any older restore points (if available) that are not listed.
12. Review what will be affected by using the selected restore point. When finished, click/tap on Close.
13. When you are ready to do a System Restore with a selected restore point, click/tap on Next.
14. Click/tap on Finish to begin the System Restore.
15. Click/tap on Yes to confirm. This is your last chance to cancel the System Restore.
16. Your PC will now restart and perform a System Restore.
17. When the System Restore has completed successfully and you have signed back in to your desktop, click/tap on Close.
Warning: select the correct restore points when the problem originally start occurs.
To do this,
1. Do step 2, step 3, step 4, or step 5 below for how you would like to open System Restore.
2. Open the Win+X Power User Tasks Menu, click/tap on System, and go to step 6 below.
3. Open the Control Panel (icons view), click/tap on the System icon, and go to step 6 below.
4. Open the Control Panel (icons view), click/tap on the Recovery icon, click/tap on the Open System Restore link, click/tap on Yes if prompted by UAC, and go to step 9 below. (see screenshot below)
5. Open the Control Panel (icons view), click/tap on the Recovery icon, click/tap on the Configure System Restore link, and go to step 7 below. (see screenshot below)
6. Click/tap on the System protection link on the left side. (see screenshot below)
7. If prompted by UAC, click/tap on Yes.
8. Click/tap on the System Restore button.. (see screenshot below)
9. If this is your first time doing a System Restore, click/tap on Next. (see screenshot below)
10. If you had previously done a System Restore, select (dot) Choose a different restore point, and click/tap on Next. (see screenshot below)
11. Select a restore point (ex: "System restore test") that you would like to restore Windows back to, and click/tap on the Scan for affected programs button. (see screenshot below)
Note:
If displayed, check the Show other restore points box at the bottom left corner to be able to see any older restore points (if available) that are not listed.
12. Review what will be affected by using the selected restore point. When finished, click/tap on Close.
13. When you are ready to do a System Restore with a selected restore point, click/tap on Next.
14. Click/tap on Finish to begin the System Restore.
15. Click/tap on Yes to confirm. This is your last chance to cancel the System Restore.
16. Your PC will now restart and perform a System Restore.
17. When the System Restore has completed successfully and you have signed back in to your desktop, click/tap on Close.
Warning: select the correct restore points when the problem originally start occurs.

Sep 26, 2015 at 01:18 AM
Sep 26, 2015 at 01:23 AM