


Intel HAXM (Hardware Accelerated Execution Manager) supercharges Android app development by leveraging Intel Virtualization Technology. This powerful tool dramatically speeds up the Android emulator, enhancing efficiency and performance on both Windows and macOS. With easy integration and setup, it transforms sluggish emulators into a fast, smooth development experience, making it a must-have for developers seeking to optimize their workflow.
What is Intel HAXM?
Intel HAXM (Hardware Acceleration Execution Manager) is a tool designed to enhance the management and control of Android and IntelVT emulation systems, operating through Android SDK's hardware-assisted virtualization engine. For Android developers, Intel HAXM is likely a familiar name. This software plays a crucial role in accelerating the Android development process, offering optimization through effective virtualization techniques.
Note: Intel will no longer maintain Intel HAXM.
What are the key features of Intel HAXM?
- Hardware-assisted virtualization: Utilizes Intel Virtualization Technology (VT) to accelerate Android emulator and other virtualization tasks, improving performance over purely software-based emulation.
- Improved emulator performance: Intel HAXM significantly boosts the speed and efficiency of the Android emulator, making it ideal for Android app development and testing.
- Efficient use of system resources: Optimizes the utilization of system resources, ensuring a smoother operation of emulated environments and reducing CPU load.
- Customizable memory allocation: It allows you to allocate memory to the emulator based on your specific requirements, enhancing resource management flexibility.
- Support for multiple OS platforms: It is compatible with both Windows and macOS, offering versatility for developers across different operating systems.
- Seamless integration with development tools: Works with popular development tools like Android Studio, facilitating a streamlined development process.
- Easy installation and configuration: Designed for simple installation and configuration, helping developers quickly set up their development environment.
- Enhanced graphics performance: Some versions include support for GPU acceleration, improving graphics performance in the emulated environment.
How to use Intel HAXM?
Once you install the app correctly, it should be automatically recognized by your virtualization engine. There's no need for extra steps to accelerate this process – just wait for the engine to detect the app and start the optimizations. You also have the flexibility to customize the experience to fit your needs. Enabling GPU acceleration can help you maximize your GPU's performance, and you can disable Hyper-V if needed.
If you're using Avast antivirus, you might encounter some compatibility issues. For a smoother experience, it's advisable to uncheck the Use nested virtualization option in the Avast settings.
How to install Intel HAXM on Windows?
- Initiate the installation by running the downloaded installer and approving the User Account Control (UAC) prompt.
- Begin the installation process by selecting the Install option.
- Access the Intel HAXM documentation by clicking on the provided link.
- A screen will display the progress of the installation.
- After the completion of the Intel HAXM installation, click Finish to close the installer.
- Intel HAXM has now been successfully installed and is available for use.
Troubleshooting
In case you encounter an installation failure due to hardware requirements, here are some BIOS/OS settings to check:
- Verify that VT (Virtualization Technology) is enabled in your BIOS settings.
- Make sure that Execute Disable Bit is also enabled in the BIOS.
- On Windows, ensure Data Execution Prevention (DEP) is active. To do this, go to Control Panel > System > Advanced system settings > Advanced tab > Performance section > Options (or Settings) > Data Execution Prevention, and confirm that DEP is enabled.
- If you're using Windows 8 or later, ensure Hyper-V is disabled: Type "Control Panel" in the Windows search box. Navigate to Control Panel > Programs and Features > Turn Windows features on or off. Here, disable Hyper-V and click OK.
How to install Intel HAXM on macOS?
- Begin by opening the DMG file you downloaded and launch the installer found inside.
- Initiate the installation process by clicking on the Continue button.
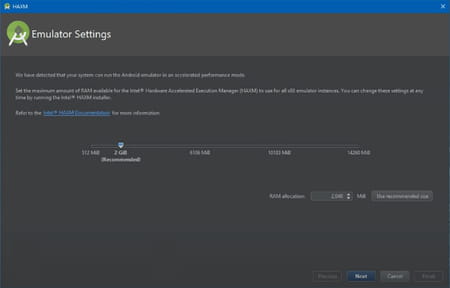
- Set the RAM allocation for Intel HAXM; you can either adjust it manually or use the default setting of 2048 MB. The installer doubles as a tool to configure Intel HAXM, allowing you to modify memory settings later by re-running the installer.
- Review and confirm your RAM allocation for Intel HAXM, then click Continue.
- Verify the allocated capacity and the installation location of the HAXM driver, then select Install.
- Enter your password when prompted.
- After the installation of Intel HAXM is completed, close the installer by clicking on the Close button.
- Intel HAXM is now installed and ready for use.
Is Intel HAXM free?
Intel HAXM is absolutely free to use.
Is Intel HAXM safe?
Yes, Intel HAXM is a safe-to-use open-source project.