
How to install Ubuntu on Windows 10: dual boot, USB, disk


Ubuntu is an open-source operating system (OS), based on Debian Linux distribution, that is appreciated for its secure system, user-friendly interface, and low system requirements. Here we explain to you how to install Ubuntu on Windows 10 in dual boot.
Making some space
If you want to install Ubuntu, first make sure you have more than one NTFS partition (one of them consisting of Windows). If this is not the case, you have to create free space on the hard disk. You can allocate free space on the hard drive through the Windows Command-line.
- Log to your Windows with the administrative account.
- Right-click on the Start Menu, then choose Command Prompt and Run as administrator.
- Type diskmgmt.msc on the prompt to open the Disk Management Utility.
- Right-click on C:.
- Select Shrink Volume.
- In Enter the amount of space to shrink in MB we recommend choosing at least 20000MB/20GB. Next, select Shrink.
The unallocated space should now be created. Reboot your computer.
Create a live disk/USB
You know have to create a bootable USB stick or a disk so that you can boot and install the operating system from the media:
- Choose the Ubuntu version, select the "Desktop image", and download it
- If you choose to create a bootable USB stick, you have to use a dedicated piece of software such as Universal USB Installer or Rufus.
- Otherwise, you have to burn the image to a disk
Boot to live disk/USB
Now that you created some space for your Ubuntu OS, and have created a media to install it, you can start the installation process:
- If you choose a bootable USB, plug it into your computer
- Otherwise, if you choose a disk, insert it into your drive
- Restart your computer
- While your PC is booting, you have to open the boot menu: F2, F10, F12, etc. - it depends on the manufacturer's specifications
- You can now choose Boot from USB/Removable Media.
Booting may take some time but you should end up seeing the Ubuntu Boot Screen with different options on it. Choose Install Ubuntu, press Enter.

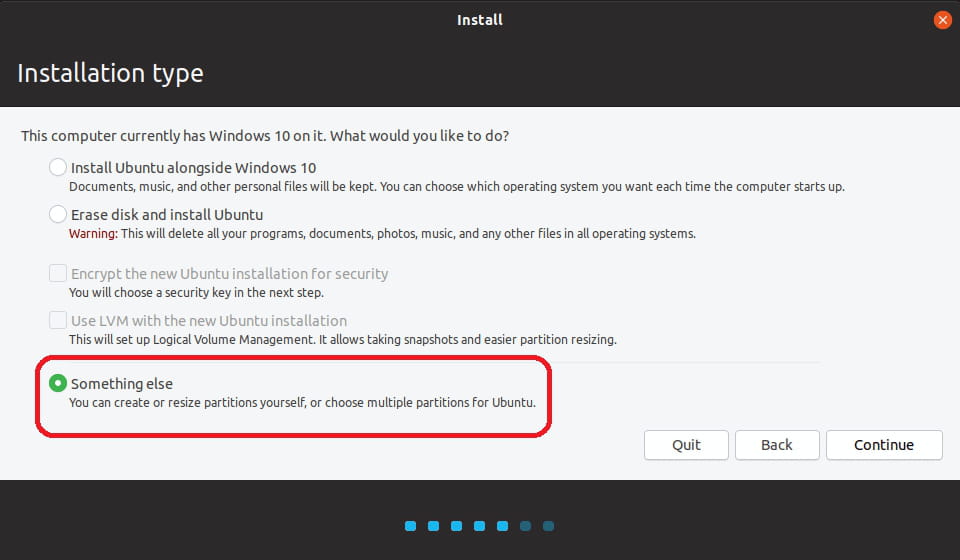
Installation type
Now, you can choose your preferences, such as the language and the installation - we recommend selecting Normal installation. Confirm your choices by clicking on Continue. Do not choose “Erase disk and install Ubuntu”.
Next, you will have to prepare the new partition for Ubuntu - Windows is already installed on the first one. When the Installation Type window appears, choose Something Else.
If you already had multiple partitions beforehand, you will need to delete an NTFS or an ext4 partition in order to create some free space: this will delete all the data from the chosen partition - do not choose the partition on which Windows is installed.
To do this, click on the location of your choice, and then on the - sign.
Root, home, swap
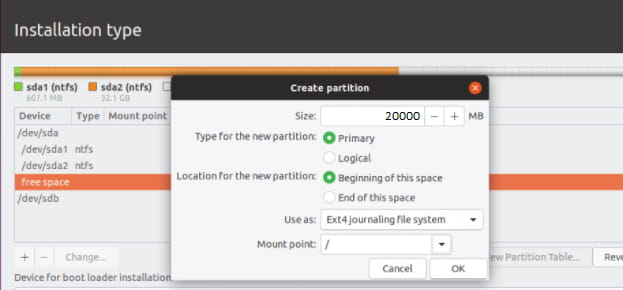
You will now have to create partitions for root, home, and swap. In order to do this, choose the free space and click on the + sign.
First, create the root partition. Set the following settings:
- Define at least 20000MB/20GB for the size.
- Choose Primary for the section Type for the new partition.
- Select Beginning of this space as Location for the new partition.
- Set EXT4 journaling file system for the section Use as.
- Set the Mount point as /.
Then, create a swap partition:
- If you have less than 2GB RAM, select at least 2GB; if you have 2-8GB RAM, select the same amount; for 8-64 GB RAM, select 4GB to 0.5XRAM
- Choose Primary for the section Type for the new partition.
- Select Beginning of this space as Location for the new partition.
- Set swap area for the section Use as.
- Set the Mount point as /.
Finally, create the home partition:
- Define the rest of the free space
- Choose Primary for the section Type for the new partition.
- Select Beginning of this space as Location for the new partition.
- Set EXT4 journaling file system for the section Use as.
- Set the Mount point as /home.
Click Install now. If you did not choose to create a swap partition, ignore the pop alert and press Continue. Accept the changes.
Post install
Now that this is done, select a location (the nearest city), pick a username, and set a strong password. Press Continue.
At the end of the installation, you should restart your computer in order to completely finish the process.
Next time you start it, you will have the choice between booting Ubuntu or Windows. As Ubuntu is set by default, it will start automatically if you don’t choose within 10 seconds. Images: Ubuntu/Edited screenshots from TecMint