
How to remove background from image online and free

You do not have to be a graphic expert to clip an item, or remove the background, on a photo. Tools are available for pros, and they also offer other advanced functions. However, Remove.bg is a free, online tool that will allow you to clip an image with just a few clicks. Continue reading to find out how to get started.
What is clipping?
Clipping — not to be confused with cropping — is a graphic operation of isolating or removing an element from an image. It can be a face, a character, an animal, a vehicle, a plant, or an object — in short, everything that is finite, that is to say with a delimited outline.
Generally, it is performed to arrange the isolated element on a neutral background — as is done to cleanly add a product on a catalog or a label, for example — or to achieve a montage, incorporating the element in another image. Clipping allows you to perform special effects by replacing one face with another or placing a character or object in another frame, different from the place where the original photo was taken, a technique frequently used in advertising.
Clipping for pros
At the origin of photomontage, clipping was done manually by cutting a photo print. Needless to say, it required extreme care and patience. Now, professionals do so simply on a computer with specialized software, such as Photoshop or Gimp (a free equivalent).
Online clipping for beginners
For non-professionals, especially those who can not afford the costly Photoshop, there are much simpler and affordable solutions online. Many sites offer automated or assisted clipping, and these services can be used with a simple web browser. Some sites, like Clipping Magic, do this work for a fee.
For occasional clipping, it's better to use a free site like Removebg (bg = background). This service is entirely in English, very easy to understand, and can be done very quickly in a few seconds once you upload an image containing the item you want to clip.
Easy clipping with Remove.bg
To get started, open your web browser and go to Removebg. To select an image stored on your computer or mobile device, click the green Select a Photo button:

The classic file selection window will appear, allowing you to browse for the photo that you want to use. As soon as you have selected a photo, the file is automatically sent and a progress bar appears to indicate the progress of the import:

After a few seconds (the time varies depending on the size and complexity of the image) two images are displayed side by side: on the left, the original, and on the right, the result of the clipping:
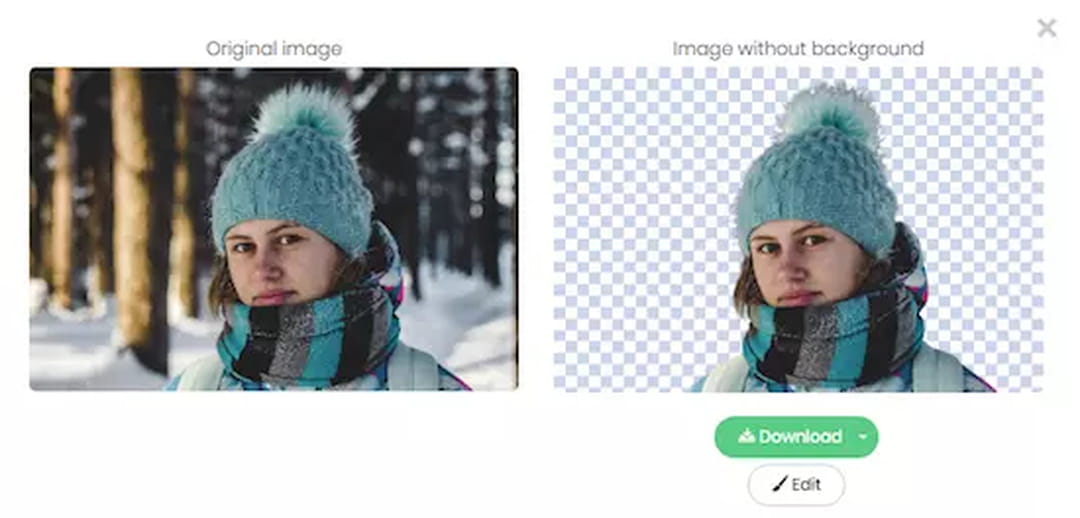
Remove.bg works very well. It is able to correctly trim hair — a difficult task to achieve by hand — and even eliminates curved areas, like an arm:

If you are satisfied with the result, click the green Download button to save the image.
Functions to refine your clipping
The algorithms used by Remove.bg are remarkably powerful and, in most cases, the first result is impeccable. However, if the image is too complex or if the result does not entirely satisfy you, it is possible to retouch the image.
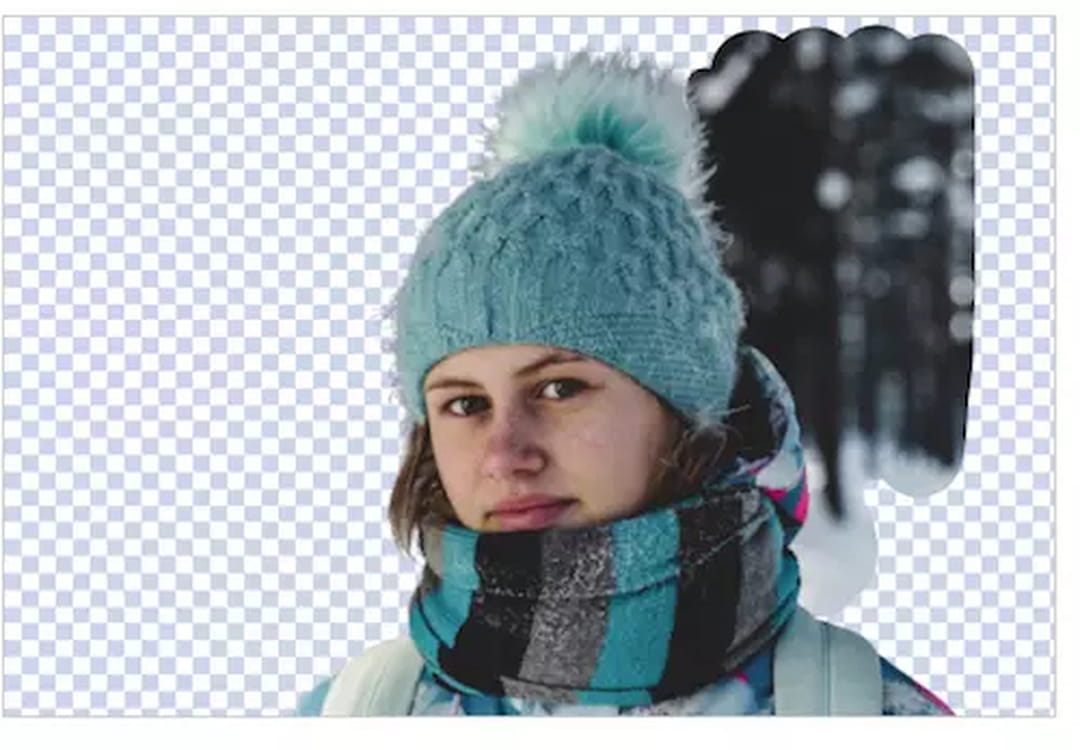
To do this, click the small Edit button located under the image. A window will, then, display the cut-out image and some very simple tools on the right:

The foreground is the cut-out element. An Erase tool can be used to erase zones, and the Restore function recovers areas erased by the clipping:

Click the button of your choice based on the touch-ups that you want to make, then adjust the linear slider just below to adjust the thickness of the line of your tool. Then, move the mouse over the areas to retouch by clicking its left button. Depending on your setting, you will see areas appear or disappear:

Note that there is also a Zoom button at the bottom of the window to adjust the magnification and allow you to work more finely on details. A simple click on the button, and you return to 100%.
In case of error, do not panic: just click the Undo button at the bottom of the window to cancel your last edit. It even works with several levels to erase several successive edits. And if you do not like any of your changes, click the Reset button next to it to find the initial clipping.
Easy keying
The lower part of the editing window (Background) allows you to create a photomontage in a few clicks. More precisely, it makes it possible to easily embed the cut-out element on a background. However, it is not possible to move or resize the element; it is just a collage on a background. Two types of backgrounds are proposed: uniform background and image.
To embed a colored background, click the Color button. A color palette will, then, appear to select from:

Click the color banner at the bottom to set the overall tone, and then refine the hue by moving the slider in the colored rectangle. If you wish, you can use the presets available in the small squares at the bottom, or even manually specify a value in Hexadecimal in the appropriate field:

When you are satisfied, click OK.
To embed a background image, click the Photo button. You can, then, choose one of the proposed random images — which change with each connection — or select a file stored on your computer by clicking the Select a photo button:
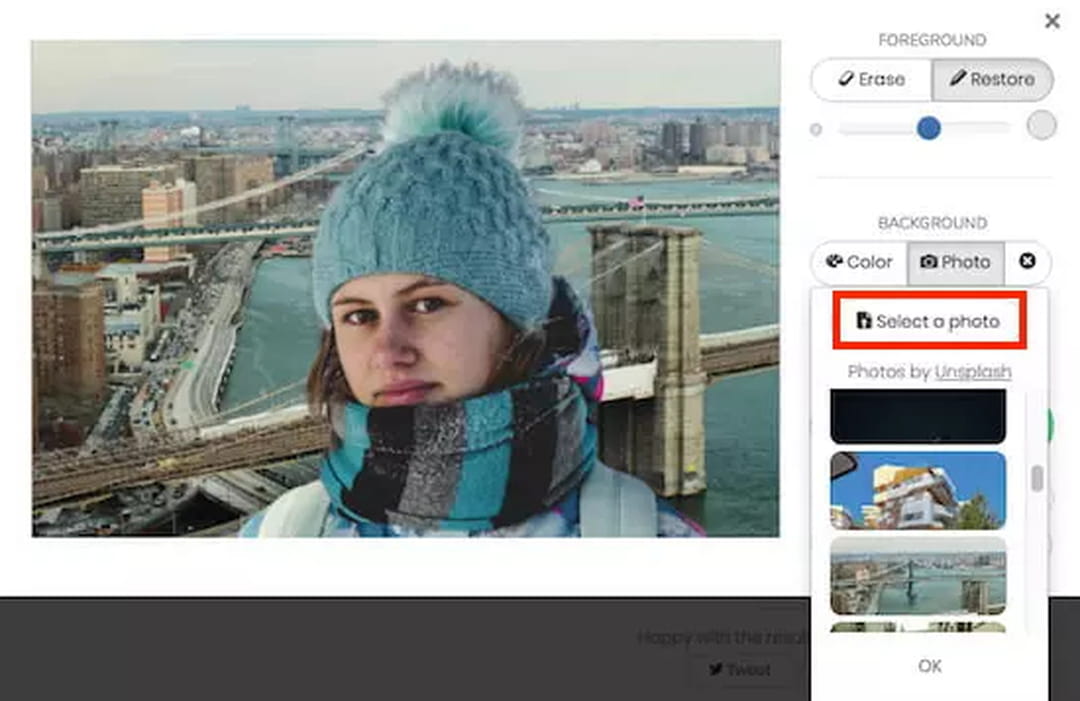
A classic selection window will open, allowing you to browse your disk tree, and the image will be loaded as soon as it is selected. Click OK when you have made your choice.
The cropped item will, then, appear on your background photo, but this time you have a Blur slider that allows you to blur the background. Adjust it to your taste: on the left, the bottom is perfectly clear, on the right, you get a magnificent Bokeh effect:

When you are satisfied with the result, click the Save button to retrieve your montage.
Limitations of Remove.bg
As practical and effective as it is, Remove.bg imposes some constraints and has some limitations. For starters, it accepts images in classical formats JPEG, PNG, etc., but it only generates images in PNG format (with transparency).
In addition, it accepts images of any size, but it only generates images at most 0.5 megapixels (for example, from one of 625 × 400 pixels). This is insufficient definition to perform professional work, or even to make a large-format print of a photomontage. However, this is enough to publish an image on a social network or print a private invitation, for example.
It should be noted, however, that this size limitation only applies to the free version of Remove.bg. The site also offers a pay-per-view service, which is capable of generating high-definition images of up to 10 megapixels.
Finally, it should be noted that an automatic trimming will never be as good as a manual trimming done by an expert using software such as Photoshop or Gimp. Complex images, like certain subjects, require real know-how associated with the powerful tools. Nevertheless, Remove.bg produces admirable results where the subject is prominent.