How to fix Nvlddmkm.sys error: Windows 10, Windows 11

If your Nvidia gameplay is being interrupted by a frozen screen, a black screen, or a blue screen of death with an Nvlddmkm.sys error message, try not to panic, it happens to many Nvidia GPU users. This article will teach you several fixes that you can try to get rid of it.
Update the graphics card drivers
Often, outdated GPU drivers cause errors. So, first of all, update them if needed:
- Type device manager in the Search bar in the Start menu.
- Search for the Display Adapters option in the new window and expand the menu.
- Right-click on the Nvidia GPU and select Update driver.
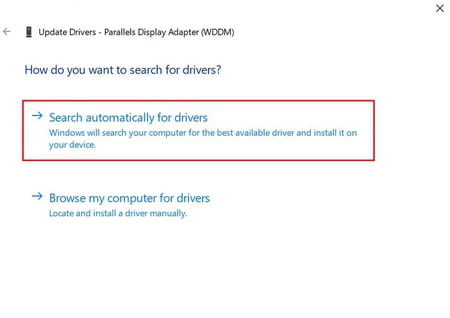
- Next, select Search automatically for drivers.

- This way, Windows will find the latest drivers and install them
-
Restart your PC to apply the changes.
Update Windows to the latest version
Often, the nvlddmkm.sys error occurs because of compatibility problems if you are running an outdated Windows version. Try to update it and see if it fixes the problem:
- Press Win + I keys and go to Update & Security.
- This will show you if there are any updates available. If there are, click on Download or Install now and wait until the process is finished. Then, restart your PC.
Underclock the GPU
The nvlddmkm.sys error can also be fixed by underclocking your GPU.
- To do it, first, download and install the MSI Afterburner software.
- Then, launch the MSI Afterburner and go to the Core Clock slider.
- Adjust it and move it towards the left to the -50, more or less.
- Click on Apply and Save the changes.
- Restart your PC and check if the problem persists.
Run a disk & memory check
A faulty memory or storage problem can also cause the nvlddmkm.sys error, so it's better to check if everything is okay there.
- Check your disk for error by going to cmd (simply search for cmd in the search tab). Select Run as administrator. Type chkdsk /f c: . Hit Enter. You'll see a prompt asking you to run CHKDSK, type Y and hit Enter. Close all tabs and restart your computer. The utility will run the disk check in the meantime.
- The Windows Memory Diagnostic tool will help you to run the memory check. To access it, press Windows + R keys. In the Run command window type mfsched.exe and hit Enter. Reboot your computer to run a check and see i the issue is fixed afterwards.
Remove and reinstall graphics cards drivers
If none of the above worked, there is another method – removing and reinstalling of graphics card drivers.
- Open Device Manager and go to the Display adapters option. Expand the menu and right-click on GPU, select Uninstall device.
- Select Delete the driver software for this device > OK.
- Download the lates Nvidia drivers and install them. Reboot your computer.
- Now, head to the system folder that houses your drivers (in many cases, this is C:\Windows\System32\drivers\).
- Locate the nvlddmkm.sys file, and rename it as nvlddmkm.sys.old.
- Now, open the command prompt by pressing the Windows key + R and typing cmd.
- Type cd, followed by the Enter key. Then, type expand.exe nvlddmkm.sy_ nvlddmkm.sys, and press Enter again.
- This command will allow you to unzip the nvlddmkm.sys file (which was previously saved at the root of C:) and create a new file instance.
- Copy the new file to C:\Windows\System32\Drivers, and then restart your PC to let the changes take effect.

