
Take a screenshot: on Mac, Windows 10, iPhone, PC, Android


There are several ways of how to take a screenshot on a Windows computer, macOS, iPhone, and Android. Read this article to find out the simplest and fastest ways for all four operating systems.
How to take a screenshot on your Windows PC?
Using keyboard shortcuts
The process of taking a screenshot on Windows 7, 8.1, and 10 is pretty much the same. To take a quick screenshot using a keyboard shortcut, open the webpage or a picture you’d like to capture and simultaneously press the [Windows] key and the [Print Screen] button on your keyboard.
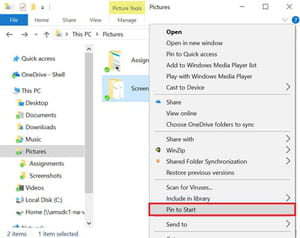
The screen will flash as the image is captured. You will then find the screenshot in the Pictures folder, under the sub-folder Screenshots, where all screenshots are automatically saved (C:\This PC\Pictures\Screenshots).
To find this folder again quickly, right-click on the Screenshots folder and select Pin to Start.
After this, you will directly access your screenshots folder from the Start menu.
Another solution is to paste the screenshot in an application like Paint, Adobe Illustrator, Adobe Photoshop, etc., and then to save it in any location that you'd like.
Using the Snipping Tool
The Snipping Tool which is available on Windows 7, Windows 8, and Windows 10, is very useful for taking screenshots because it allows you to select the part of the screen you would like to capture. You can also highlight and add notes to the images.
To find the tool, type Snipping Tool in the search bar.
To gain faster access, you can add it to your taskbar. To do so, right-click on Snipping Tool, before entering it into the search bar, and click Pin to taskbar.
From now on, the screenshot tool will be directly accessible from your taskbar. Note that the Save function allows you to save the photo in any location you like.
How to take screenshots when using two screens?
If you use two screens and want to screenshot only one of them, simultaneously press the [Alt] + [Print Screen] buttons on the keyboard. This will take a screenshot of your active screen, where your mouse pointer is located.
How to take screenshots on a Mac computer?
On current versions of the macOS you can take screenshots by pressing Shift-Command-5. You'll be able to choose the area for your screenshot and even take a video of any part of your screen. Click Capture to take a screenshot. Next, you can save it anywhere on your computer. There are variations of screenshots for Mac:
- Shift-Command-3 for the entire screen.
- Shift-Command-4 for a specific part of the screen. You should drag the cursor to outline the area you want to capture. This also lets you screen record.
How to take screenshots on Android?
There are two ways of taking a screenshot on your Android device.
-
Hold down the power button and press the volume-down button.
- Press and hold the power button and choose to take a Screenshot in a new pop-out window.

Then, you can find them in your Photos app.
How to take screenshots on iPhone?
Taking a screenshot on iPhone is easy. Simply press the side and volume-up buttons simultaneously (Home button and side button for older iPhones). Then, you'll get a thumbnail image on your screen, you can tap on it to edit it or swipe it to use it later. You will find your screenshot in the Photos app.