
How to use Apple wallet: to pay, online, in store

Apple Wallet allows you to add any type of card, coupon, or ticket, so you can use it anytime, without the need to fill up your wallet with all the cards you own. If you want to learn more, here's how Apple Wallet works and how to set up the app on your Apple device in just a few steps.
How to add a card to Apple Wallet?
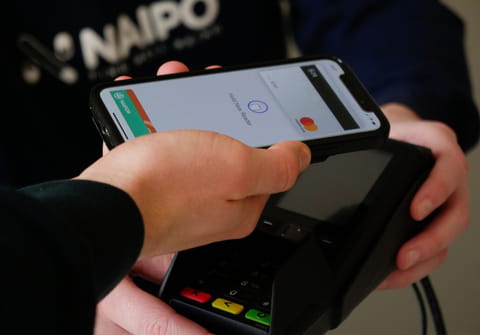
To use Apple Wallet, the first thing you need to do is to set up Apple pay by adding the credit cards you wish to use, this app will allow you to pay via your iPhone with a double click on the side button.
- Open Wallet and press the + button to add cards.
- After that, tap Next and follow the steps that appear on the screen.
- Wait for the bank to check if your card is suitable to use with Apple Wallet as a payment card, tap Next again.
- When accepted, you can safely use your credit or debit card on Apple Wallet in enabled stores (in contactless payment), for public transport, or any online purchases.
How to add a ticket on Wallet for iPhone?
Apple Wallet is a useful application to keep at hand your flight boarding passes, coupons, supermarket loyalty cards, movie tickets, and more. For example, when buying an airline ticket online, you can add it directly to Apple Wallet from the confirmation email, the browser, the airline app (if Wallet-enabled), or by scanning the barcode or QR Code via the iPhone Camera app. Once the ticket has been recognized, it will be immediately available in the ticket section of Wallet.
When it's time to use it, simply access the Wallet app on your iPhone and show it to the appropriate person for scanning. Alternatively, if the ticket can be used in cashless mode, the procedure is the same as for cashless payments, i.e. bringing the phone close to the reader for scanning or validation.
How to enable ticket notifications on Apple Wallet?
If you want to receive notifications about your tickets on your iPhone, open Settings, then Notifications, and finally Wallet. Here you can enable notifications by simply tapping the Allow Notifications button.
If you're interested in activating notifications for a single ticket, open the Wallet app, then tap on the ticket you're interested in, and then tap More (the three horizontal dots). After that, all you have to do is tap the Allow Notifications button.
How to manage tickets on Apple Wallet?
If you want to access the details and manage your tickets, tap the icon with the three horizontal dots. In the new window that will open, in addition to the details of each ticket, you will find some important settings, such as:
- Automatic updates: (useful for example in case of a flight modification schedule). To update it, just enter the ticket page and pull it down.
- Automatic selection: to find the ticket when you need it
- Show in lock screen: you will be able to view the tickets according to your location and time. If you wish not to remove this option, go to Settings, Wallet, and Apple Pay. Once you've done that, turn off the Press Home Button Twice or Press Side Button Twice option (for models with Face ID).
- Share ticket: allows you to send it to your contacts (not all can be shared).
- Remove ticket: once you have used the ticket you can permanently delete it from Wallet. This option can also be done from the ticket page, by pressing the up arrow icon (right) and then Delete. You can also remove multiple tickets at once, on the Wallet page. Press Edit Tickets, then the red circle next to each ticket, and finally Delete.