Do you want to record a video of your iPhone screen to give instructions or share something you like? The process is very simple and can be done without downloading third-party apps. Since iOS 11 version (available for iPhone 5s and later models), the iPhone has a native function to record videos of what happens on your screen and capture the sound of some apps, as well as external audio if you want. Here's how to record your iPhone screen.
How to record your iPhone screen?
Note: these steps can also be followed to record the screen of an iPad (iPad Air and upwards) or iPod touch (6th generation and upwards).
1. Enter Settings and select Control Center. (If you are an iOS 13 or earlier user, click Customize Controls.)
2. Scroll down to the More Controls section and tap the + button next to Screen Recording. Immediately, the option will appear in the Included Controls section and will be added to the Control Center. You can change its position by clicking on the horizontal lines on the right side.
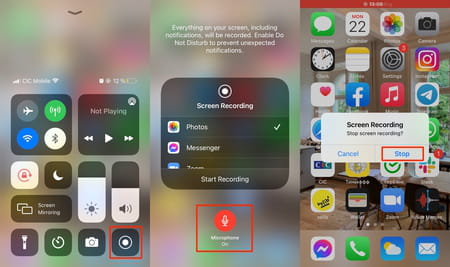
3. Open the Control Center by sliding your finger from the top of the screen down if you have an iPhone with Face ID. On models with a home button, slide your finger across the screen from bottom to top.
4. Press the Record button to start recording after a three-second countdown. By default, the audio coming out of the iPhone will be recorded. If you want to record external sound, press and hold the record button and tap the microphone icon to activate it.
Note: some applications do not allow you to record audio.
5. To stop recording, open the Control Center and click on the record button again or tap the red button at the top of the screen and select Stop.
6. Done! Your video will be automatically saved in your Photos app. Now you can record the game or video you like so much or show someone what you want on your screen.
How to use the record option to share your screen?
If you have a call in progress on Skype, Zoom, Messenger or Meet, you can use the record button to share your iPhone screen. You just need to press and hold the Screen Recording button in Control Center, choose the app you want to stream with and tap Start Broadcast.
How to remove the sound from your recording?
If you prefer your video to have no sound, follow these steps:
1. Open the video in the Photos application.
2. Click on Edit in the upper right corner.
3. Tap the sound icon in the upper left corner, and then tap Done to save your changes.
IOS
- How to record your iphone screen
- Record your iphone screen
- How to film iphone screen
- Save website to iPhone home screen: Safari, iOS 13 > Guide
- How To Record Your Computer Screen in Windows 10
- Apple Plans Curved OLED iPhone Screen - CCM
- Samsung Smart View on iPhone: screen mirroring > Guide
- How to lock iPhone screen rotation: landscape, portrait > Guide
- Restore settings icon on iPhone: to iPhone home screen
- How to turn off music on iPhone
- Share PC internet to iPhone: via USB cable, via bluetooth
- Apple iPhone 13: release date, design, specs, price
- Apple iOS 15.2: release date, update, beta, devices
- How to calibrate iPhone compass: app, iOS 14, Google Maps
- Apple AirTags: range, battery life, features
- How to hide App Store: on iPad, on iPhone, hide apps
- Safari iCloud tabs: not closing, not working, disable
- How to install apps on older iOS versions
- How to disable Game Center: iPhone, iOS15, notifications
- How to restore missing App Store icon on iPhone/iPod
- How to turn off sim pin code on iPhone
- Recover a draft email on iPhone: not saved, dissappeared
- How to sync iPod without removing existing songs
- Сonnect AirPods to PC, Macbook
- Mirror iPhone to PC: via bluetooth, without software
- How to sync iPhone and iPad: messages, contacts, apps, email
- Use iPhone as hotspot: for PC, for Mac, for iPad, Wifi
- How to manage app permissions: iPhone, iPad
- iOS 14 update: download, features, for iPhone 6, date
- How to reinstall Cydia: on jailbroken iPhone
- How to change your Apple ID country or region
- Raise to listen: iPhone, not working, feature
- Turn off cellular data iPhone: shortcut, travel
- How to turn on flash for notifications iPhone
- How to turn off autocorrect on iPhone?
- How to change the PIN code on your iPhone?
- How to transfer photos from iPhone to your PC or Mac
- Turn AirPods into a speaker
- How to sync mail to iPhone: Gmail, Yahoo, Outlook, Hotmail
- Clean AirPods: pro, case, microphone
- How to copy URL in Safari on iPhone
- Use Face ID with mask: iPhone, not working, Apple Watch
- Unlock iCloud account: activation lock, apps
- How to turn off Dial Assist on iPhone
- Sync your iPhone with your PC or Mac: iTunes, iCloud, Finder
- Apple iPhone medical ID: create, login, access
- Backup your iPhone: to iCloud, Mac, PC
- Use Apple wallet: to pay, for tickets
- How to set up internet on iPhone
- Create an iPhone ringtone from MP3: without iTunes, online
- Disable the upload of burst photos on iPhone 6
- How to hide your caller ID on iPhone
- How to download and select a ringtone on iPhone
- How to use the Game Center on iPhone
- Backup SMS from iPhone: to computer, Google Drive
- How to turn off Safari suggestions: iPhone, iPad, Mac
- How to reset location and privacy on iPhone and iPad
- How to force quit apps on iPhone, iPad, macOS
- How to enable Autofill in Safari on iPhone and iPad
- How to enable text dictation: iPhone and iPad
- How to turn on the handwashing feature on Apple Watch?
- How to set screen timeout: Apple Watch
- How to turn off keyboard and lock sound on iPhone
- How to save web pages as PDF on iPhone
- How to update iPhone 5: to latest iOS
- How to restart your iPhone
- How to delete Siri history on iPhone, iPad, Mac, TV, Watch
- How to clear cache on iPhone and iPad
- How to turn off ads on iPhone and iPad
- Find my iPhone: iCloud, Apple, lost mode
- How to turn off Siri: iPhone, iPad
- How to view photos and sync a photo album on Apple Watch?