Crop in Powerpoint: custom shape, picture to circle, etc.

The cropping tools of Powerpoint 2010 can help you to cut and remove unwanted portions of your images. You can remove or hide part of an image, simply by reducing the horizontal and vertical edges. The Cropping options also allows you to trim an image to achieve a specific form or size. This article will show you the various cropping options in PowerPoint.
How to crop in Powerpoint?
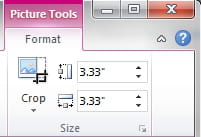
All the cropping modifications can be performed via:
- Picture Tools > Format > Size tab:

What are standard cropping options?
- Select the image to crop.
- Go to Picture Tools > Format > Size tab.
- Perform one of the following action:
- To crop one side, drag the cropping handle toward the inward side.
- Simultaneously to trim the same amount from both sides, press and hold the CTRL, drag the center cropping handle inward on both sides.
- To crop and image on all four sides, press and hold the CTRL, drag the center cropping handle inward on all the four side.
- To set the trimming position, move the crop box (by dragging the edges of the rectangular selection box) or image.
- Press Esc when you are finished.
- To extend or add a border around an image, drag the cropping handles away from the center of the image.
How to crop to a custom shape?
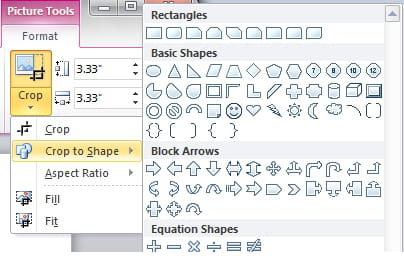
To quickly change the shape of the image, you can crop to a specific shape. The image is then automatically cut off to complete the geometry of the chosen shape (the proportions of the image will be saved).
- Select the image or images you want to crop to a specific shape. If you crop multiple images, you will need to make use of single shape or work on them individually.
- Go to Picture Tools > Format > Size tab.
- Click on the small arrow under the Crop option > Crop to shape > select your shape:

- From there you can adjust the image size and choose if you want to preserve the proportions of the original image.
How to crop to known proportions?
You may want to crop an image to a specific size:
- Select the image.
- Go to Picture Tools > Format > Size tab.
- Click on the small arrow under the Crop option > Aspect Ratio > Make your selection.
How to delete cropped areas?
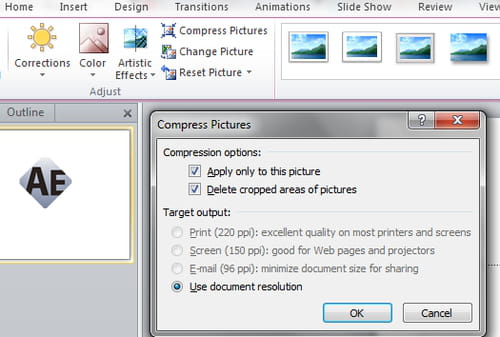
The cropped portions of your images are still part of the image file (hidden). You can reduce the file size by removing these parts. Note that: This operation can not be canceled.
- Click on the cropped image.
- Go to Picture Tools > Format tab > Adjust > Compress Pictures.
- Check Delete cropped areas of pictures.

- Click on OK to validate.

