
Connect Android to PC: via WiFi, USB


Taking pictures or recording videos with your phone can quickly overwhelm your device's storage capacity and cause low memory alerts. One solution to this problem is to transfer the photos and videos to your PC. This way, you can keep your valuable memories on your PC, gain space, and speed up the processes on your mobile device. In this article, we show you the different ways you can connect your Android smartphone to your computer.
How to connect an Android phone to a PC via USB cable?
On Windows
Although it seems easy enough, sometimes it is not enough to connect one end of the cable that comes with your phone to the computer's USB. Many times we have to go into more complicated configurations of drivers, manufacturer's applications, etc. But let's take it one step at a time:
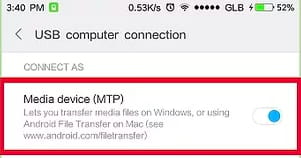
First of all, connect your Android phone to your PC using the USB cable. You will see a screen that says Upload files or Transfer files. Select the MTP or Media Transfer option.
By choosing that option your computer will create a folder where you can access your files.
On Mac
If you're a Mac user, the system won't detect your smartphone on MTP but what you can do is to download the Android File Transfer. This is a simple tool created by Google that will allow you to manage your files.

You can download and install it from the official website by clicking here.
How to connect an Android phone to a PC using the manufacturer's own software?
Most cell phone brands have their own software to manage the files you download to your computer. Here you can download the latest updates of these software:
- For Samsung cell phones click here.
- For Sony phones click here.
- For Xiaomi smartphones, click here.
- For LG phones, click here.
- For Huawei phones, click here.
How to connect an Android phone to a PC via WiFi?
The best way to transfer files without using cables is via WiFi, using the AirDroid application. You can download it for free by clicking here.