Remove write protection: from USB, SD card, hard drive

If you are unable to edit or save files on your USB drive, SD card, or hard drive, it is likely that your device is locked in read-only mode. This article will introduce you to a few ways that you can unlock write protection.
How to unlock a write-protected USB?
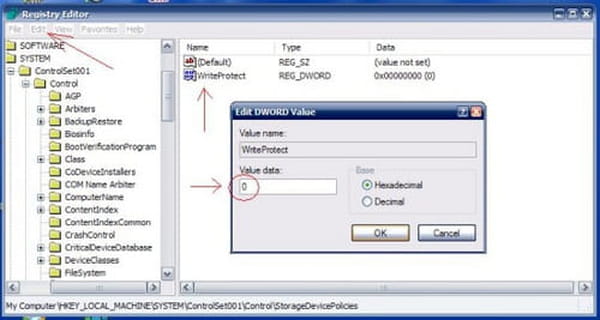
To remove the write protection, simply open your Start menu, and click on Run. Type in regedit and press Enter. This will open the registry editor.
The next step is to navigate to the following path:
HKEY_LOCAL_MACHINE\SYSTEM\CurrentControlSet\Control\StorageDevicePolicies
Double-click the WriteProtect key located in the right side pane and set the value to 0. Go to the Data Value box and press OK:

To finish, simply restart your system, and then reconnect your USB pen drive to the computer.
How to remove write protection from an SD card?
If you are sure that your SD card is virus-free and you are not low on space, you can remove the write protection using CMD (command prompt). To do so, right-click on Start and then choose Command Prompt (Admin). Next, select Yes. Once this is done, type diskpart and press Enter. After that, type list disk and press Enter again. This will allow you to see the list of the connected storage media. Now, type select disk X where X stands for the number of your SD card, for example, "select disk 4". The next thing you have to do is to type attributes disk clear readonly and confirm by pressing Enter. And done! You can now exit by typing exit and pressing Enter, then typing exit again, and hitting Enter one last time.
You should note that this solution can also remove the write protection from a pen drive and a hard drive.
How to remove write protection from hard drive?
Type CMD in the search field next to the Windows button and choose Run as administrator. Give the Command Prompt permission to make changes by selecting Yes. Now, type chkdsk x: /f where you replace x with the letter of the drive of your choice, for example, chkdsk c: /f. You will get an error message - just type chkdsk x: /f/r/x where the first x is the letter of the drive of your choice, for example, chkdsk c: /f/r/x. Press Enter. And done! If this doesn't work, you can try the solution from the previous section, as it is quite universal.
How to unlock a USB drive?
Many USB keys come with a switch that slides up and down to enable or disable the write protection lock. As a first step, we recommend that you verify whether your USB has this switch (normally labeled with a hold or locked option). If so, simply unlock the switch and attempt to write.
Another simple solution for disabling write protection is to simply ascertain whether or not your current file is being viewed in Read-Only format. If it is read-protected, simply right-click on the folder and uncheck the "Read Only" button.
There are many online recovery tools that are related to a specific brand of a USB stick. For example, utilize the JetFlash Online Recovery tool to repair Transcend USB keys which gives the user the flexibility to either maintain stored information or the format key.
What online tools to disable write protection?
A number of brand-specific online tools are available to help you disable write protection on your USB key. JetFlash Online Recovery is a common tool used to repair Transcend USB keys because it gives users the flexibility to either maintain stored information or format their key.
How to format a USB key?
If none of the above options work, you can always try formatting your USB key. You can find more information on formatting your flash drive in our dedicated article.

