
How to install Windows 11 on an unsupported PC?


Due to Microsoft's hardware requirements, Windows 11 is not compatible with many computers, especially old ones. However, there are solutions to install Windows 11 on any PC. Read on to discover all of them.
Why is Windows 11 incompatible with some PCs?
Windows 11 has been available since October 5, 2021. The program includes a redesigned interface, an updated Start menu, a strong comeback of widgets, new virtual desktops, etc. Unfortunately, many PCs probably can't take advantage of it. Microsoft requires a recent processor (excludes models over four years old), and the computer's motherboard must be equipped with a TPM 2.0 module (Trust Platform Module). This is a chip integrated into the motherboard that stores encrypted data that can be used in authentication phases, for example. Without this little component, it is impossible to update your PC to Windows 11.
Microsoft justified these requirements for performance and security reasons, but they have raised many protests. And they remain intolerable for some computers. Mainly, since the first pre-release versions of the new system worked perfectly well on older PCs, without TPM 2.0... This situation has led hackers to look for ways to install Windows 11 on officially non-compatible PCs. Even Microsoft suggested a workaround with all the necessary warnings.
The editor has thus indicated on its support page a method to install Windows 11 on a PC that does not have a TPM 2.0 module (but at least a TPM 1.2 module). And if your PC doesn't meet this requirement, there's more. A clever developer has found a solution to override all of Microsoft's restrictions. AveYo has designed a script that bypasses the publisher's controls to install Windows 11 on any PC running Windows 10. It is based on the Media Creation Tool, which is well known for downloading ISO files from Microsoft systems or making bootable Windows USB sticks. This time, the utility includes the Skip_TPM_Check_on_Dynamic_Update.cmd script, which makes it needless to check for the presence of the TPM module and even that of a recent processor by writing information in the Windows Registry. Thus, we can proceed with installing the new system without being blocked.
Using this method, we can upgrade to Windows 11, a 2009 MSI PC (without the TPM module) powered by an Intel Core i7-2630QM processor, and a Windows 10 running in a virtual machine in VMWare software without any restrictions.
Note: the MediaCreationTool utility by AveYo is not the official Microsoft tool for installing Windows 11. It is impossible to know for the moment whether a system installed this way will be able to accept future updates offered by the publisher. Similarly, it is strongly recommended to use it as an experiment on a slightly old PC that is only used occasionally or, better still, in a virtual machine. Moreover, there is no guarantee that Microsoft will not find a solution in the final version of Windows 11.
Contrary to Microsoft's warnings, officially non-compatible PCs that have switched to Windows 11 seem to benefit from updates via Windows Update. This is the case for the first package of patches released on the second Tuesday of each month – the famous Patch Tuesday – whose October 12 version was automatically installed without any problem on computers that were deprived of it. However, no one knows if this will also be the case for the following updates.
How to install Windows 11 with the Microsoft method?
Even if it strongly advises against it, the editor proposes a solution to install Windows 11 on a PC without the TPM 2.0 module on its support pages. However, the machine must have at least a TPM 1.2 module installed. The manipulation is based on a simple modification of the registry. Download Windows 11 and follow the onscreen instructions. When you see the message "This Pc can't run Windows 11", follow these steps:
- Hit Shift + F10 to open the Command Prompt window.
- Type 'regedit' and hit enter.
- The Windows Registry Editor will open. In the address bar, type 'HKEY_LOCAL_MACHINESYSTEMSetup' and hit Enter.
- You'll see a 'Setup' key. Right-click it and select New > Key.
- You'll have to give it a name. Choose 'LabConfig' and hit Enter.
- Right-click the new key and choose New > DWORD (32-bit) value
- Give it the name 'BypassTPMCheck' and set its data to 1.

- Follow the same process for 'BypassRAMCheck' and 'BypassSecureBootCheck', with the same value of 1.
- Close this window with the red X in the top-right corner.
- Close the Command Prompt window by typing 'exit' and pressing Enter.
- You'll be at the 'This PC can't run Windows 11' message again. Click the back button in the top-left corner.
- That's all! You can now proceed to update your PC to Windows 11.
How to apply the Windows 11 installation patch?
This patch has been deposited on the GitHub platform. However, the author gives few details on how to apply it.
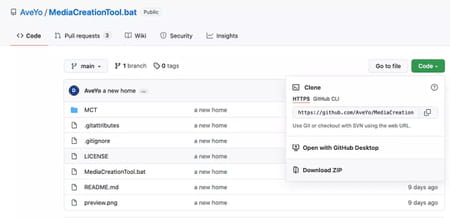
- Go to the GitHub page dedicated to the CreationMedia Tool.
- At the top right, click on the green Code button and then choose Download Zip to download the necessary files.
- Unzip the Zip archive and double-click on the Skip_TPM_Check_on_Dynamic_Update file.
- In the dialog box that appears, allow Windows PowerShell to be opened. A command prompt window will appear. Wait a few seconds for the script to run. The window then closes automatically, and the patch is applied.
How to install Windows 11 with MediaCreationTool?
After running the script, the Windows registry was modified. You can now install Windows 11 in two ways: either by upgrading Windows 10 or by reinstalling Windows completely. In both cases, the Windows license is automatically recognized: you will not have to enter a number during the installation.
- Double-click on the MediaCreationTool file in the folder you've downloaded.
- A new command prompt window will appear, with a second window showing several options. It allows you to see several versions of Windows: from Windows 10 1507 to Windows 11. Click on this last option.
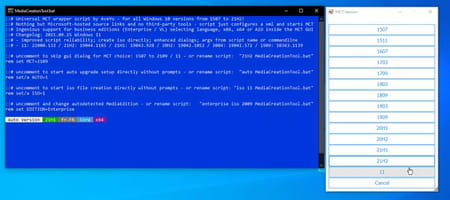
- New options are displayed. The first one, Auto Setup, allows you to perform an upgrade directly (however, during our tests, we couldn't complete it). The second option, Create ISO, allows you to transform Windows 11 into an ISO file. Create USB allows you to create a bootable USB key with the upgrade. Finally, Select in MCT allows you to choose between creating an ISO image or a USB key or proceeding with the upgrade immediately from Media Creation Tool. We recommend that you choose either Create ISO or Select in MCT. If you choose Create USB, you will need a USB stick with a capacity of at least 8 GB. In our example, we will create an ISO image.
- After clicking on Create ISO, a new dialog box will appear. Allow access to Windows PowerShell again.
- The Media Creation Tool will be launched. It will automatically download the latest version of Windows 11 currently available.
- Once Windows 11 is downloaded, shut down the PC's Internet connection. Disable Wi-Fi and unplug the Ethernet cable if your PC is connected to the Internet by wire. The tool can check with Microsoft if your PC is compatible. Then open the ISO file Win_11_21H2 downloaded in the same folder as Media Creation Tool.
- Finally, double-click on Setup to launch the installation of Windows 11. Then follow the step-by-step instructions on the screen.
- Once the installation process is finished, you must proceed to the first usual settings. You will then find your applications, software, user accounts, and documents. Don't forget to reactivate Wi-Fi or reconnect your Ethernet cable.