Change your computer name on Windows 10/11: CMD, settings

The Computer Name (or PC Name) identifies a computer on a local network. This tutorial describes several simple methods on how to change the name of a Windows 10 computer.
How to change PC Name on Windows 10, 11 via settings?
1) Click on the Start menu and then go to Settings > System > About section. Under the Device specifications section, click on Rename PC.
2) Type the name you'd like to use and click on Next.
3) You will need to restart your PC to apply your new settings. Click on Restart Now to proceed.
How to change PC Name from the Control Panel?
1) Right-click on the Start menu > Control Panel > System. Go to the Computer name, domain, and workgroup settings section and click Change Settings.
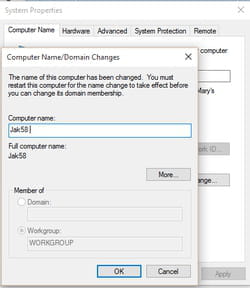
2) This will take you to System Properties dialogue window. Go to the Computer Name tab and click on the Change button. Edit the current computer name and click OK:

3) Restart your PC and you're good to go.
How to change your computer name via Command Prompt?
1) Press the Windows key + X to open the Quick Access menu. Then, click on Command Prompt (Admin).
2) In the Command Prompt, type WMIC computersystem command to change your computer name, assuming you know the current computer name.
WMIC computersystem where caption='current_pc_name' rename new_pc_name
3) Replace current_pc_name with your current computer name and new_pc_name with a new computer name.
4) After running the command, you need to reboot the computer to save the changes.
How to change your PC name from PowerShell or Windows Terminal
And here we give you one more way to change your computer name. Open PowerShell or Windows Terminal as administrator and type this command:
Rename-Computer -NewName "New PC Name
On this command line, instead of New PC Name, write new name.
After restarting your computer, you will see that your computer already has a new name.

