How to remove password control at login on Windows 10?

If you are the only one using your computer, you can easily skip the password required each time you start Windows 10 by deactivating it. Here is how to get started.
How to disable password at login?
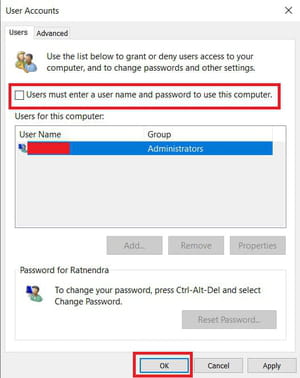
1) Type the Windows + R keyboard shortcut. In the box that appears, enter the netplwiz command and confirm by pressing the Enter key, or by clicking OK.
2) The User Accounts window will appear. Simply uncheck the box in front of the option. Then, enter your username and password to use the computer. Click OK to validate.

3) A new window, titled Automatically sign in, will appear to ask for you to confirm your choice and verify your identity. The account name should be the only one available, and with administrator status. Enter your password in both fields, then click OK:
N.B: The operation affects all referenced accounts if you have more than one.
How to remove password verification after sleep mode?
The previous step only works when the computer starts. If you do not do anything else, it's possible that Windows will still ask you for a password each time your PC comes out of sleep mode, which can be even more annoying if it happens more than once in the day. There's a setting to avoid this control.
1) Right-click the Start menu, then click Settings in the list that appears.
2) In the window that opens, click Accounts.
3) The contents of the window will change to display the settings related to user accounts. In the left column, click Sign-in options.
4) Go to the Require sign-in section. Then, select Never, instead of When PC wakes up from sleep:

Now, Windows will no longer require a password every time your computer comes out of sleep mode.
N.B. Remember that your PC's account will no longer be protected. So, remember to reactivate these security options if you have to expose your computer to other people.

