
How to insert a transparent image into an Excel document


There are at least two possibilities to insert an image into an Excel document, the first is to insert an image directly and the second is to insert an image in a form. In this article we will discuss both methods and show you how to apply transparency to the inserted image.
How to insert an image directly into Excel?
- Click on Insert > Image.
- You can enter the picture you want but if you enter an image of 1920 x 1088 pixel, Excel will display an image having the following dimension 1920 x 1088 cm.
- Another solution: Use an image control tool (OCX Controls), spread it on the sheet, right click and select Developer > Insert > Image and apply it to the sheet.
- Right click on the image and select Properties.
- Set PictureSizeMode = 3
- In the Properties window, go to Picture and select an image to be included in the control.
- So far the picture is inserted into the control while maintaining the width/height ratio. You can adjust the size of the control to coincide with the dimensions of the image. However it should be noted that transparency options are not available.
How to insert an image in a form?
- Click on Insert > Form.
- Draw the rectangle.
- Right click and select Format Shape. Select picture or texture fill.
- Simply use the image of your choice.
- Using this method you can adjust the transparency of the image, but not its ratio.
In the following section we will show you how to do the following:
- Insert an image while keeping the ratio.
- Keep the dimensions
- Keep the ratio of the image.
- Transparency available.
How to insert an image with transparency?
- Using GDI + APIs for the dimensions of the image.
- You can move the image, rotate it, change the dimensions of the available area. But it is not advisable to resize the image with the handles (and thus lose the ratio of the image).
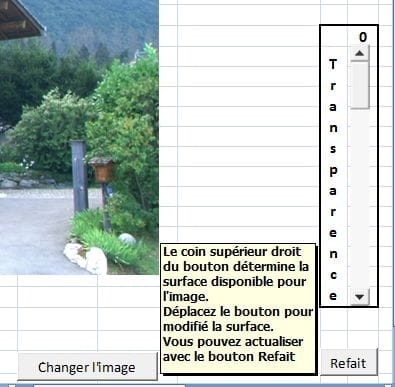
- For the demo we have determined the surface area available with the top right of the button Changer Image:
- It is easy to directly enter the dimensions in the code In Module1, look for the RemplaceImage routine.
 'Rectangle disponnible pour l'image, en points
    With Sheets("Image").CommandButton1
        Dispo.W = (.Left + .Width)
        Dispo.H = .Top
    End With
- Replace these lines with
'Rectangle disponible pour l'image, en points
        Dispo.W = La largeur en point
        Dispo.H = La hauteur en point
CAUTION: These dimensions are not those of the image, depending on the ratio of the image file only one of the two will be effective.
Do you need more help with excel? Check out our forum!
Subject
Replies