
How to Install Windows 11 on SSD


To make your computer run stable and fast, we recommend installing Windows 11 on an SSD drive. Here we give you a step by step guide on how to install Windows 11 on SATA/M.2/NVMe SSD.
Now the latest version of the Microsoft OS, Windows 11 with all the new features, is available to users. To safely update and install Windows 11 on your PC, follow these steps:
- Buy an SSD - SATA, M.2 or NVMe SSD. A SATA SSD will cost you half the price of another drive (about $20 instead of $50), but it gives you less speed. The choice is yours.
- Check that your SSD is suitable for installing Windows 11. To do this, turn off the computer, open the computer case, connect and insert a new SSD (M.2 or NVMe) into the SSD slot and fix it with screws. When you have completed this, restart your computer.
- You should now open Disk Management. To do this, press Windows key + R, type diskmgmt.msc + Enter.
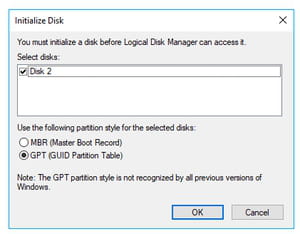
- Right click on the new SSD, select Initialize Disk and assign GPT as the disk type. Select GPT as the target type.
You can now upgrade your Windows to Windows 11 and move Windows 11 to an SSD.
More Windows questions? Check out our forum!
Subject
Replies