
How to create a system restore point in Windows?

System restore is part of the Microsoft Windows Operating System. It allows the rolling back of system files, installed programs, registry keys, etc. to an earlier state in case of a system breakdown. Windows can even create restore points automatically when you need them the most. This article explains you how to create a restore point.
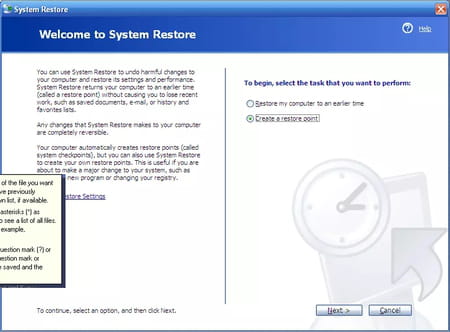
How to create a system restore point?
Go to the Start Menu, then to Programs -Then Accessories, and finally, System Tools -Select System Restore -Select Create a restore point -Click on Next -Enter a name for the restore point: the name must be evocative: Click Create and the restore point is created automatically.
Hot to restore from a restore point?
Go to the Start Menu, then to Programs -Then Accessories, and finally, System Tools -Select System Restore -Select Restore my computer to an earlier time -Click on Next -Choose from the calendar posted on the restore point (left) -Choose from the list on the right (if a choice is possible) the specific restore point -Click on Next -Click on Next The system will reboot to restore the files modified systems.
How to modify the rate at which restore points are created?
Windows is configured to perform a restore point by default every 24 hours. A restore point is created if the system detects a change in the registry. If you have to add or remove applications regularly (downloading, testing, debugging new software), it is recommended that you optimize the rate at which restore points are updated for security constraints.
Below is a simple explanatory procedure on how to configure this setting:-
First of all, open the registry editor by typing regedit in the Run menu and pressing OK.
Click on: HKEY_LOCAL_MACHINE\SOFTWARE\Microsoft\Windows NT\CurrentVersion\SystemRestore.
In the right table, double click on click on the DWORD entry named RPGlobalInterval. Modify from Hexadecimal to decimals.
The default parameters are settled to a time-lapse of 86400 sec (24 hrs). Modify this value by dividing it by 2 (43200 sec) if you wish to have two restore points. This practice may be beneficial in case of a system failure.
Note that you can manually create your restore point (before installing a demo version of the software for testing purposes).
To perform this setting:
Go to Start menu > all programs > Accessories> System Tools > System Restore. Then select the option "create a restore point".
In the text box, enter the description of your restore point (this is very important to identify between the different restore points created, the one you created manually and the others that default to your system.) It can be the name of the program you are going to install.
You can now roll back from any modifications made to your previous configuration.
How to modify the rate at which restore points are deleted?
Restore points are indeed very useful but remember that they also occupy a significant space on your hard disk (depending on the size of your hard disk, a restore point can occupy several gigabytes). Another constraint of earlier created restore points is that after a given period, they no longer work and clutter your hard disk unnecessarily. Deleting your unused restore points to save space on your hard disk is more practicable. To do this, follow these instructions:
In the registry, as explained above, double-click on the value DWORD recognized as RPLifeInterval
Enter the restore point lifetime value to 604800 sec to delete if it has more than a week of a lifetime.
Earlier created restore points can be deleted manually:
Double-click on My Computer and right click on the hard drive, and select Properties. Then click on Disk clean up. In the new window, select Disk Clean Up and other options. In the Other options, press Clean for System Restore.