Compress images with Google Squoosh

If you need to send a large image or upload it to one of your social networks, the easiest way is to compress the file. In this article, you will learn how to do it by using Google Squoosh.
Before sending your photos with WhatsApp or uploading them to your Facebook or Instagram, it can be very helpful to compress them: by reducing their weight you also reduce data consumption and transfer time. To help you optimize the size of your images without losing too much quality, Google has created Squoosh, its own online image compression service. It's free and available from any browser, so you can use it on Windows, MacOS and Linux as well as on Android or iOS devices.
How to upload images to Google Squoosh?
1) Go to the Squoosh website and click on Select an image.
2) On your computer, tablet or mobile phone, find the image you want to compress, select it and click Open. Alternatively, you can drag and drop it into the Squoosh window.
3) Once you have uploaded the image, you will see the screen divided in two:
* On the left side, you will see the original image (you can see its size in the lower-left corner).
* On the right side, you will see the compressed image (the size after optimization is shown in the lower-right corner).
If you are satisfied with the amount of compression, download the image directly by clicking on the download icon on the right side of the screen (white arrow on blue background).
4) If you want to compress another image, click on the leftwards arrow icon in the upper left corner of the screen.
How to optimize image compression?
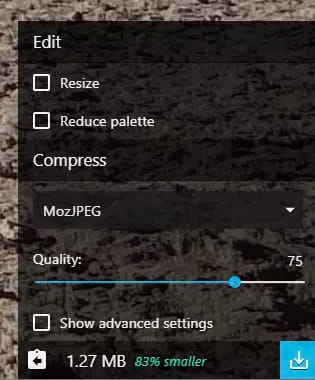
If you would like to adjust the compression more precisely, you can do so by using these options:
- The Quality indicator serves to define the general degree of image compression. Slide it to the left to make it lighter or to the right to restore the quality (by default you will find it set at 75).

- Check the Resize box if you also want to resize the photo (reduce the number of pixels across the width and height of the image). Use the predefined ratios that you'll find in the Preset drop-down list and remember to always leave the Maintain aspect ratio option enabled to preserve the proportions of the original image.
- Select Reduce palette and move the Colours indicator to the left to reduce the number of colours in the image. After each of these optimizations, you can compare the before and after by dragging the vertical bar that appears on the image.
When you are finally satisfied with the result, click on the download icon at the bottom right to save your new compressed and modified image.
Is Google Squoosh free?
Yes, this app is completely free of charge.


