How to create a Hanging Indent in Google Slides

Google Slides is a powerful and easy-to-use tool to create professional presentations. It offers many options, including formatting ones. In this article, we'll explain how to create a hanging indent in Google Slides via the menu or just with your keyboard.
What is a hanging indent?
A hanging indent is a handy text-formatting feature that allows you to divide and organize your text. The name comes from the idea that the first line of the text has a basic indentation, and the lines below are indented. So it looks like the first line "hangs" out over the rest of the text. This formatting style is useful when it comes to bibliographies and academic citations, or when you want to focus viewers' attention on a specific part of your text.
How to create a hanging indent in Google Slides?
Here's how to make a hanging indent in your Google Slides presentation.
- Open your presentation in Google Slides and click on View > Show Ruler (if it's not enabled already).

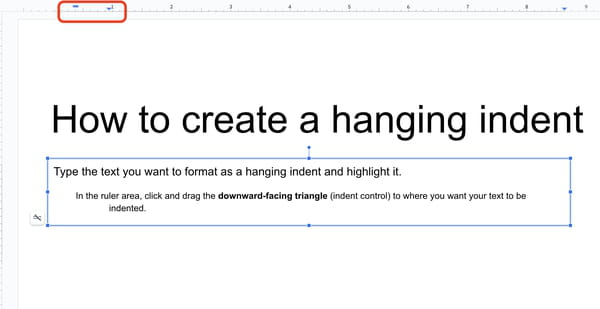
- Type the text you want to format as a hanging indent and highlight it.
- In the ruler area, click and drag the downward-facing triangle (indent control) to where you want your text to be indented.
- Next, click and drag the blue line above the triangle that regulates where you want to place the first line of the text.

- Finally, you've created the hanging indent for your presentation. Your Google Slides presentation will follow this format. If you'd like to, you can edit the formatting following the same instructions.
How to create a hanging indent in Google Slides with your keyboard?
There is another, quicker way to create a hanging indent in Google Slides using your keyboard.
- Open your Google Slides presentation, and place your cursor at the opening of the line you want to indent.
- Press the Enter + Shift keys simultaneously.
- Click the Tab key to indent the line.
