macOs Ventura: release date, compatibility, new features

Since October 24, Apple has been releasing macOS 13 Ventura, the latest version, macOS 13.2 Ventura was released in January. In this article we will break down everything you need to know about the latest version of macOS, how to install it, which models it is compatible with, and more.
When will macOS Ventura be released?
MacOS 13 Ventura has been available since October 24, 2022. As usual, Apple started rolling out its big update to its operating system after its announcement during the Apple event. MacOS 13 is named after a remarkable place in California, in this case the city of Ventura. Already presented at WWDC 2022, the Apple Developer Conference, last June, the replacement for macOS 12 Monterey brings a large number of new features and improvements that will change the daily lives of Mac and iPads users. Here is everything you need to know to take advantage of this new system.
What are the new features of macOS Ventura?
Even if, as its name suggests, macOS is obviously intended for Macs, one of the common threads in the evolution of this system is its constant realignment towards iPadOS, as surprising as that may seem. The number of common functions and applications continues to increase over the years. And this is again the case with macOS 13 Ventura, as a Weather application, a Clock application or the Stage Manager function also appeared on iPadOS.
These similarities can be explained by the hardware that is in the new Macs and new iPads. Frequently, these devices have the same M1 or M2 chips. In other words, it is much easier today, for Apple as for independent developers, to offer applications that are compatible with all systems. The only real difference is of course how you interact with the device. Macs are through a keyboard and touchpad, and iPads are through a touch screen. MacOS 13 Ventura is compatible with a large number of Macs that are currently equipped with Intel processors (see below for the full compatibility list).
System Settings: the replacement for System Preferences
One of the great symbols of macOS since its beginnings, when it was still called Mac System with a number behind it, disappears in macOS 13 Ventura. The System Preferences panel will receive a name change, a new appearance and will be called System Settings. In other words, it adopts a name very close to that of iOS and iPadOS, since in these two systems, to access almost all the configuration options, you go to the Settings. The look of the Mac's new System Settings is also completely revamped to be closer to the iPad. There are two large main areas: a left column for navigating through main categories, and a large right area displaying all the options for each section. You will be forgiven if you feel a little lost, there are so many options. Fortunately, a search box is still available at the top of the left column.
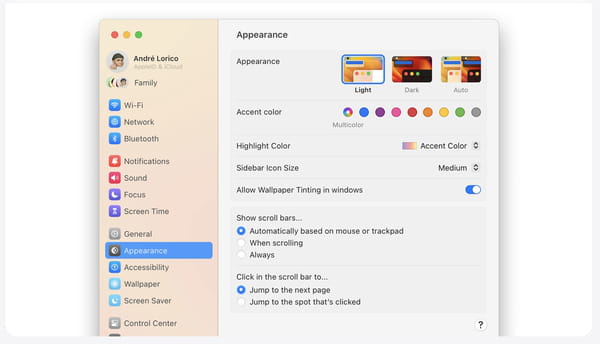
Another sign of the coming together between Macs and iPads is now in the System Settings that you will find all the information about your Mac, both its model and the details of its software and hardware configuration. Same for storage management. In other words, goodbye to the famous About This Mac window, still available from the Apple menu, but reduced to its minimum portion.
When you are used to the Mac, this change from Preferences to Settings is disconcerting, even if you understand Apple's desire to visually harmonize all of its system platforms. However, we regret that the System Settings are not more adapted to the habits of the Mac. Indeed, you can lengthen the window vertically, but impossible to widen it horizontally.
Stage Manager: an additional way to manage windows
Unlike the iPad up to iPadOS 16, the Mac never lacked window management features. This does not prevent macOS 13 Ventura from adding another one in the form of the brand new Stage Manager function which groups the windows of each application and arranges them on the side of the screen in a miniature perspective view. By default, these thumbnail views occupy the left part of the screen but if you have already placed the Dock there, then Stage Manager is installed on the right side. In other words, when the Stage Manager function is activated on your Mac, you only see in front of you the window or windows of the same application at a time. The windows of other applications are just waiting for your click on the edge of the screen to take center stage, while the current application is automatically stored on the side, to wait patiently for you to return to it. We can see the full influence of the iPad on this function, with the iPad having been designed to use only one application at a time, in full screen.
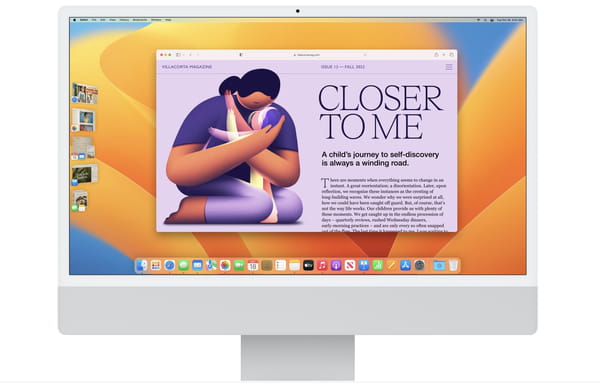
That said, this new function does not replace the so-called Spaces virtual screens that have existed in macOS for many years, but rather as a complement. This is probably why, on Mac, Stage Manager is not activated by default. To do this, you have to open the Mac control center with a click at the top right in the menu bar, then activate the new Stage Manager button which has therefore appeared in macOS 13. When opening it for the first time a window briefly explains what it is and offers a button to activate it. The following times, the function will be activated or deactivated without further process. Be careful, when you activate Stage Manager, the desktop icons disappear. Nothing is erased, rest assured, it's just that Stage Manager on Mac copies the operation of Stage Manager on iPad which does not have a Desktop. Two solutions. To see your Desktop files, open a Finder window to show the contents of the Desktop folder. Or, go to System Settings, Desktop and Dock Section, and click the Customize button in the Stage Manager section. There you will be able to enable the Desktop Items option.
Once activated, Stage Manager therefore looks like a kind of new Dock, like the one that displays the icons of the most frequently used applications that we most often have at the bottom of our Mac screen. And like the Dock, thumbnail representations of application groups can be automatically hidden. It will then suffice to bring the mouse to the left edge of the screen to bring up Stage Manager, then select the group of windows that you want to see displayed again. Stage Manager thumbnails also disappear if you bring a window close to the edge of the screen where they are.
FaceTime: switch from one device to another without cutting the conversation
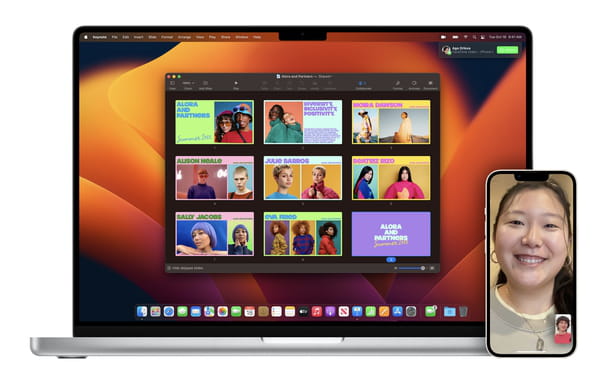
Apple extends the capacity of its Continuity functions which allow, for example, you to start writing an email on the iPhone to finish it on your Mac. This will also be possible with an ongoing FaceTime call that you will have started on your iPhone on the way home and which you can automatically transfer to your Mac once you get home.
iPhone: use the smartphone as a webcam
It's been many years since the camera(s) of the various generations of iPhones have been much better than the webcams built into the Mac, even the latest generation ones. This is why there have also been applications for several years that allow you to transform your iPhone into a webcam relatively simply. Previous software examples include Camo Studio or EpocCam from Elgato. Apple has announced that Macs equipped with macOS 13 Ventura will automatically be able to use an iPhone equipped with iOS 16 as a webcam.
As usual, Apple makes using an iPhone as a webcam very simple. All you have to do is approach your iPhone, even when switched off, to your Mac so that the latter detects it and offers to use it as a webcam. Apple even offers, on its online store, a magnetic support in the MagSafe format of the Belkin brand to easily hang your iPhone on top of the screen of your Mac. Attention, even if it uses MagSafe magnets, this support does not allow you to change your iPhone, but only to hold it in front of you. Better to connect your iPhone to its charger if you plan to use it as a webcam for more than a few minutes.
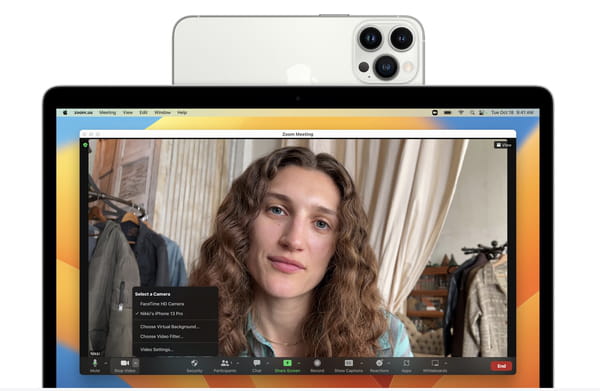
That said, Apple still goes beyond a simple function by offering an astonishing, even incredible function. If you use an iPhone with a very wide-angle lens, such as the iPhone 13 Pro Max, you can simulate a "top" shot, called Desk View, as if you had added a camera hanging from the ceiling! The iPhone remains however hung in front of you, but the Mac will be able to correct the distortions of the perspective to display the top of the table, allowing you for example to show something with your hand. And all while continuing to film you from the front with the classic wide-angle lens.
And when you don't need that top view, the Mac will be able to take advantage of the ultra-wide-angle lens to give you the Center Stage feature, which automatically crops the image based on the number of people. in front of the lens so that no one goes out of frame. And all this while taking advantage of the exceptional quality of the cameras of the iPhone. The Continuity function on the camera can be used with FaceTime as well as with other video conferencing applications such as Zoom or Skype. It is compatible with iPhones from the Xr model, provided of course that they have been updated to iOS 16.
Passkeys: moving towards a future without passwords
Apple, together with Microsoft and Google, has joined the Fido alliance, which is developing a new way of connecting to online services without the need for passwords. The idea is to replace them with alerts arriving directly on our iPhone or Mac. In the latter case, it will suffice to validate the connection with the TouchID fingerprint sensor integrated into the keyboard. This is the Passkeys system which promises to be both practical and secure. As long as it works, even if we already know that the transition will necessarily take several years, before a majority of websites and applications have become compatible with Passkey.
Mail: delayed or canceled messages
The MacOS 13 Ventura Mail application receives the same improvements as its iOS and iPadOS 16 counterparts. It will therefore allow you to program the sending of a message delayed from its writing, by a few hours or a few days.
Also, if you notice an error in an email, such as forgetting the attachment that you mention in the text, you will have ten seconds to cancel the sending and thus recover and modify your message before your correspondent don't read it. Attention, it is necessary to understand this function of cancellation rather like a function of temporization. When you click on the send button, the message is not sent immediately: Mail waits 10 seconds before sending, during which time you can click on the Cancel sending button which appears in bottom of the left column to reopen the message creation window. But after 10 seconds, the message will leave and you will not be able to retrieve it from your correspondent's inbox.
Also new to Mail is the Message Tracking Suggestion feature, which aims to send you reminders if you've failed to reply to certain messages. Finally, Mail on Mac will also have a redesigned search function and, hopefully, more efficient than the one that currently equips our machines.
Messages: the right to make mistakes
Other improvements shared with iPadOS and iOS 16, it will be possible to edit a message after sending it! Very practical for catching up afterwards on a message sent with a spelling error or an automatic correction transforming a harmless message into an embarrassing miscommunication. From here it will suffice to right-click on the message to be able to edit it. Even more radically, you can decide to cancel the message, in other words to delete the message from the conversation thread, both on your device and on your correspondent(s) (unlike the function of canceling the sending of the Mail application therefore, see above). Please note, these two new functions only concern iMessages, that is to say the messages that are sent in blue bubbles to other users of Apple devices. But not the simple SMS sent in green bubbles. And your correspondent(s) will also need to be equipped with the latest versions of the OS.
Another practical detail, it will finally be possible to mark a conversation as unread, as we have been able to do for so long in any email application. A very practical function so that you don't forget to reply to a message that you have read.
Spotlight: improved searching
Apple has also announced that the Spotlight function of macOS 13, which can be accessed for example by clicking on the magnifying glass at the top right in the menu bar of its Mac, has been improved. The idea is to facilitate not only the discovery of files on your Mac, but also of results or photos on the Internet directly displayed inside the Spotlight window.
Safari: sharing tab groups
Since macOS 12 and iOS 15, the Safari browser allows you to create groups of tabs to, for example, group web pages by theme. A good way for those who are used to opening multiple web pages at the same time to avoid having a cluttered tab bar. In iOS 16 and macOS Ventura, it is now possible to share such a group of tabs with another user of these systems. Just add a tab in the group so that each person with access to the group sees it displayed on their machines, iPhone, iPad or Mac.
Apple has also simplified the harmonization of use of Safari on all your devices. Now, if you install an extension in Safari on your iPhone, it will automatically be available on your iPad and Mac. Depending on the case, it will be installed and activated immediately. For others, you'll see the new extension appear in the extension manager window, all you have to do is activate it.
Photos: text recognition and background removal
The main update for photos is the ability to share photos. While it has been possible to create shared albums in Photos for a long time, whether on iPhone, iPad or Mac, these have limitations that prevent them from being used, for example, as a global family album. Not only do the photos that are shared in this way see their quality slightly reduced but, moreover, it is not possible to automate the addition of photos. With the Shared iCloud Photo Library, Apple is trying to offer an equivalent of the shoebox we used a long time ago, when paper photos were taken: even if we didn't take the time to create physical albums, at least all the photos were accessible by all family members. With a Shared iCloud Photo Library, you can create a sort of shared digital shoebox with up to 5 other people. Please note that you can only create one Shared Library and that naturally only works if your devices and those of the people you share it with are updated to iOS 16, iPadOS 16 and macOS Ventura. Finally, note that this sharing obviously relies on online storage. The person behind the creation of the shared library must therefore have enough space in their account to accommodate both the photos they share and those that other members will add to it.
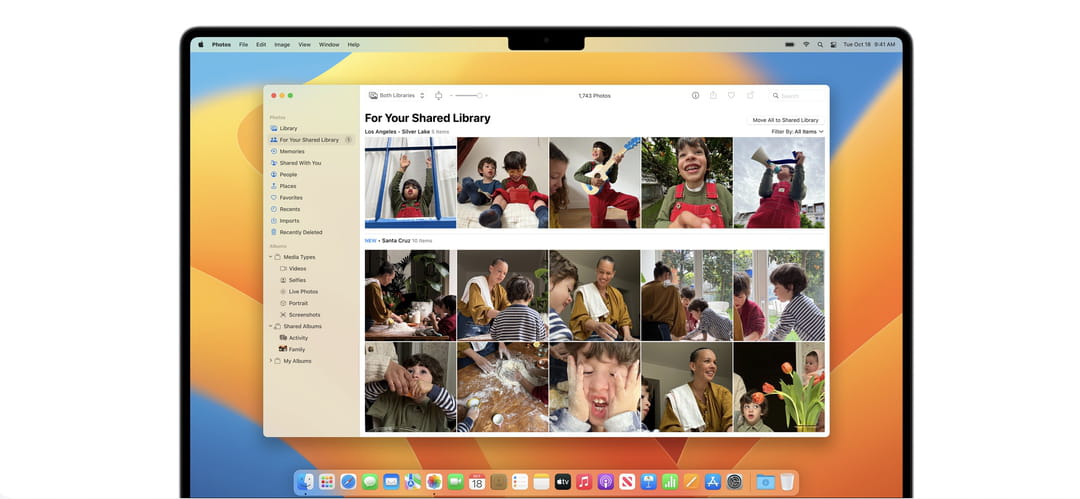
Another great novelty on the photo side, macOS Ventura, like iOS and iPadOS 16, is able to automatically detach a subject from its background in a photo. You can do this directly in the Photos application, by bringing up the contextual menu (right mouse click or two-finger click on a touchpad) then choosing the Copy subject function if the application has ever detected a possibility. This function is also directly available in the Finder. No need to open the file. Right-click its icon, aim for the Quick Actions menu, then select Remove Background. Automatically, a new file is created, in the same folder.
How to install macOS 13 Ventura on Mac?
Like previous versions, macOS 13 is free. Well, almost because its price is integrated into that of Macs. In practice, if you have a compatible model, you can download and install it for free. As usual, the easiest way is to wait until your Mac offers to update your system to macOS 13 Ventura. To speed things up a bit, if you're impatient, you can also open System Preferences and click Software Update. If Ventura is available for your Mac, all you need to do is click the Upgrade Now button. Accept the terms of use, validate by typing the password of your Mac user account and wait for the time to download the 5 GB required. Then follow the usual steps, including logging back into your Apple iCloud account. Depending on the Mac you have, the update can take between 20 minutes and 1 hour. To find out if your Mac is compatible with macOS 13 Ventura, check the list below. And if you want to reinstall everything from scratch rather than update, check out our article Reinstall macOS: Reset the system on a Mac.
Which Macs will get macOS Ventura?
As always, the arrival of a new version of an operating system means that some older devices will no longer be able to receive them. But this time, macOS 13 Ventura is doing a lot of cleaning because you need a Mac dating from 2017 or later to install it! We feel that with the transition to its own M1 and M2 processors, Apple no longer wants to work for Intel processors. Here is the complete list of Macs compatible with macOS 13 Ventura.
- iMac (from 2017)
- iMac Pro
- MacBook Air (from 2018)
- MacBook Pro (from 2017)
- Mac Pro (from 2019)
- Mac mini (from 2018)
- MacBook (from 2017)

