
Identify your motherboard on Windows 10: via cmd, DirectX


If you'd like to prevent any compatibility issues when upgrading your PC or installing new components, it's important that you first identify your motherboard model. This tutorial describes three simple ways to find information about your motherboard model (brand, chipset, and manufacturer) in Windows 10.
How to find your motherboard's brand, model, and serial number with Command Prompt?
In Windows 7, click Start and type cmd in the search bar to open the Command Prompt. In Windows 8.1, press the Windows key + X and choose Command Prompt (administrator) from the list that appears. Type the
wmic baseboard get product,Manufacturer,version,serialnumber
command and press Enter to validate.
Depending on the model of the board, the command will provide at least the manufacturer, model and chipset. All of which will be sufficient to search the Internet and review the manufacturer's manual.
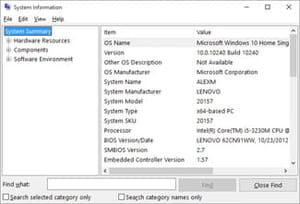
How to identify your motherboard via the system information window?
Open the Run command ([Windows key] + [R]), type
msinfo32
and click on OK to open System Information. Click on System summary and you'll get an overview of all your hardware components. Search for an entry named Motherboard (or Baseboard):
How to identify your motherboard with the DirectX diagnostic tool?
Open the Run command, type the
dxdiag
command and click on OK to open the DirectX Diagnostic Tool.
Go to the System tab and make a note of what is written next to the System Model. Use this information to refine your online search.