
How to reset Toshiba laptop: without password, Windows 10


When it comes to restoring your Toshiba laptop to its factory settings, the process is a little more in-depth than a simple reset.
Unlike other manufacturers, Toshiba does not include recovery CDs with its laptops. Instead, each laptop contains a hidden partition buried in the hard drive, which contains the computer's operating system and hardware drivers. Both are required to reset and restore a Toshiba laptop to its factory settings. This guide will walk you through how to reset your Toshiba laptop.
How to factory reset Toshiba laptop without password?
To do this, you will first need to create and burn recovery CDs that contain the contents of your laptop's hidden partition. It is important to note that some items and menus in this tutorial may vary depending on the model of your PC.
Create Recovery Media
To start the Toshiba Recovery Disc Creator, open your Start menu. Click All Programs > Toshiba > Toshiba Recovery Disc Creator:

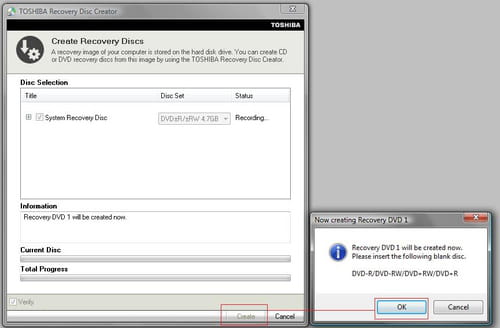
The Disk Creator Window will open, indicating the number and format of DVDs required to back up your media.
Create Recovery Discs
Once equipped with the disc(s) required, it is time to burn them.
Click the Create button at the bottom-right of the window. A message will appear, prompting you to insert a disc. Insert your DVD, and click OK:
The burning process will begin automatically. At the bottom of your screen, a loading bar will indicate the progress of the operation.
Note that if you checked the Verify box, the Toshiba Recovery Disc Creator will do an individual check of the DVDs once they've been burned. If you were asked to insert several disks, you will have to insert them as the operation progresses.
Once the operation is finished, a message will appear on the screen to confirm the burning.
Boot on CD/DVD
Turn on your computer and, when the Bios image appears, tap F12 to choose the partition on which you'd like to boot.
Once the boot menu appears, insert your DVD (or the first DVD you created, if multiple), and select CD/DVD using the up/down arrows on your keyboard. Then press Enter.
Windows will automatically load the necessary files from your DVD.
If you have correctly changed the boot sequence, you should get two options: start Windows normally and Perform a System restore. Choose the latter option, and follow the on-screen instructions to return your PC to its original state.
Restore to factory settings
Once you have booted from the DVD and the files have loaded, you will be directed to the start window of the restoration. Choose your default language, and then click Next.
A window will appear, allowing you to choose the installation (this option is only available on certain models). Choose your installation if necessary, and then click Next.
A warning will appear on-screen with a final alert that your hard disc will be completely erased. Confirm by clicking OK.
File copying will begin automatically. If your restoration has several DVDs, you will have to insert them in the proper order during the process.
At the end of the process, your computer will turn off. You will need to start it again to configure the settings.
How to reset Toshiba laptop under Windows Vista?
- Plugin your adapter to charge - this may take a while.
- Power your computer and press and hold the 0 key at the same time.
- The Recovery screen will appear. You can release the 0 key when this happens.
- If there are different operating systems, choose Windows Vista.
- A new screen will pop up, warning you that all data will be deleted. Confirm by selecting Yes.
- Select Recovery of Factory Software.
- You can now follow the on-screen instructions.
How to reset Toshiba laptop under Windows 7?
If your laptop is under Windows 7, then you can follow the same instructions as for Windows Vista. However, you will have to select Windows 7 instead of Windows Vista after the recovery screen step.
How to reset Toshiba laptop under Windows 8?
- Open the Settings app.
- Select Update and Recovery.
- From there, select Recovery.
- You can now select Remove everything and reinstall Windows by selecting Get Started.
- Follow the on-screen instructions that follow.
How to reset Toshiba laptop under Windows 10?
- Boot your laptop and press and hold the O key at the same time.
- Release the 0 key once the computer is on.
- Select Troubleshoot.
- Now click TOSHIBA Maintenance Utility.
- From there, select TOSHIBA Recovery Wizard.
- The on-screen instructions - they will guide you through the process.
How to restore Toshiba laptop using the Recovery Partition?
It's now time to proceed with the factory reset. Before proceeding, please be aware that this factory reset will erase all of the data on your hard drive. It is extremely important to back up any important data. Make sure the computer is connected to a power supply, and do not switch it off or restart it during the process.
Press and hold down the power button for ten seconds to switch off your machine. Next, press and hold the 0 key and, at the same time, tap the power button once to switch on your PC. When the machine starts beeping, release the 0 key.
A warning message will appear on-screen, prompting you to verify your system recovery. Select Yes to continue.
Next, select the Recovery of Factory Default Software option, followed by Next. Then choose Recover to out-of-box state, and click Next once more to start the recovery.
How to restore Toshiba laptop without disk?
If you want to factory reset your Toshiba laptop without a disk, we recommend referring to the summary of this article in order to select the appropriate version of Windows. You can then follow the described steps.
How to restore Toshiba Satellite to factory settings?
- Hold the power button and the 0 key at the same time.
- Once the computer is on, release the 0 key.
- Select Yes for the System Recovery.
- Once this is done, select Recovery of Factory Default Software.
- Confirm by selecting Next.
- After that, click Recover to Out-of-Box State and confirm again by selecting Next.