
How to repair Windows 7 from USB flash drive?


Most larger computers and laptops come with a system recovery CD that you can use in the event that you need to repair your device. However, netbooks often don't have a CD/DVD drive and, therefore, can't be fixed with this type of disk. To make up for this deficit, you can use this trick to make a system repair USB key, which can be used on both netbooks without CD/DVD drives and PCs.
How to create a system repair USB key?
In order to complete this process, you will need a bootable USB key with over 165 MB of free space. This article will explain How to Create a Bootable USB Drive.
How to display hidden files and folders?
Once you have a bootable USB you will want to display hidden files and folders.
- To do so go to Start > Computer > Organize > Folder Options and Search > View tab.
- Check the box next to View hidden files, folders and drives.
- Uncheck the box next to Hide extensions for files whose type is known and Hide protected files of the operating system.
How to create directories and copy the necessary files?
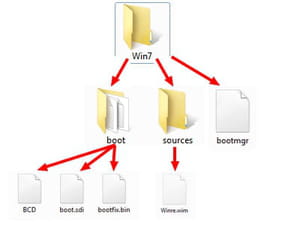
- Create a folder on your desktop called Win7.
- Open the folder, and create two folders titled Sources and Boot.
- Copy the C:WindowsBootPCATbootmgr file in the Win7 directory.
- In the boot directory, copy the C:WindowsBootDVDPCATboot.sdi, C:WindowsBootDVDPCATBCD, and C:WindowsBootDVDPCATfr-FRbootfix.bin files.
- In the source directory, copy the C:\Recovery\486aab42-cf02-11de-be22-c44fb1debe9d\winre.wim file:
- Copy the contents of the Win7 folder to the USB key.
- Rename the BCD file to bcd and the winre.wim to boot.wim on your USB flash drive.
Do you need more help with Windows 7? Check out our forum!
Subject
Replies