Create and switch between multiple signatures in Gmail

Sometimes you need to use different signatures, if you use the same email account for communicating with friends or family, or if you have more than one job. Read this article to find out how to create multiple signatures in Gmail and switch between them.
How to create multiple signatures on Gmail?
Adding a signature to your email can be very important when writing work letters. This way, the recipient knows your telephone number, address or other important contact information, such as your company name and your job title. If you don’t have any signature linked to your Gmail email account yet, you can check out how to add a signature to your Gmail account.
To create multiple signatures in Gmail, follow these steps:
1. Log in to your Gmail account and click on the gear icon in the top right to access Setting.
2. Scroll down to Signature.
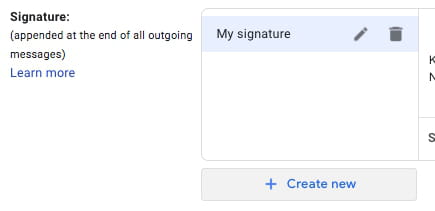
3. Click on Create New tab to add a new signature to your existing one.
4. Give it a name and click Create. Then, add the text to the corresponding box.

5. Finally, you can assign your signature defaults: for new emails or on reply/forward use by selecting the corresponding one from the drop-down menu.

6. When you are finished, scroll down to the bottom of the Settings page and click Save changes.
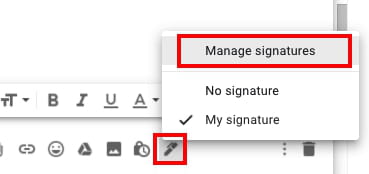
How to switch between multiple signatures?
If you decided to change your signatures whilst writing an email, click on the pen icon in the bottom right corner of your draft mail and select one of your signatures from the list or click Manage Signatures to add a new one.